
Terracotta pot heaters make it easy to stay warm on a budget and add a rustic feel to your home. Learn how to stay warm without spending a fortune by building a DIY clay pot heater at home. This easy project will help you escape the cold and create a cozy atmosphere in your home.
For a detailed walkthrough of the process, check out our DIY clay pot heater tutorial video on YouTube.
Materials needed
Luckily, this heater project doesn't require a long shopping list. Plus, the items you need are readily available and won't cost you a fortune. Bonus!
- 1x large terracotta flower pot
- 1x Medium terracotta flower pot
- 1x 10M threaded bar
- 8x 10M nuts
- 1x 10M Nylock nut
- 6x 10M washers (large enough to cover the holes in your terracotta pot)
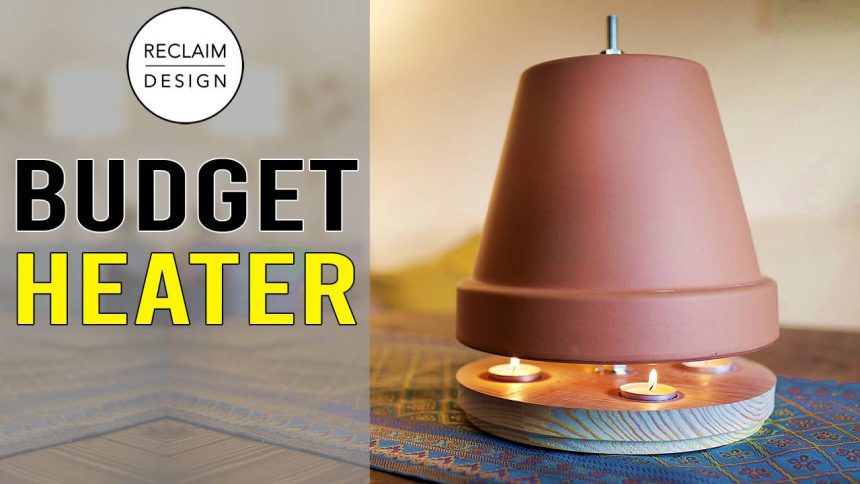
- Base x 1 (I made a circular wooden base from reclaimed wood, but you can use a terracotta flower pot base if you're not into woodworking)
- 4 tea light candles
Stainless steel threaded bars, nuts, and washers are also an alternative, but at a higher cost. Some online comments warn against using galvanized threaded rods and nuts or washers due to the potential for oxidation of the zinc and the release of toxic gases. Research shows that zinc oxidizes at 1600°F, a temperature not reached in tealight candles. Additionally, placing the candle far from the threaded rod prevents it from being directly heated, making safety concerns unwarranted. After an 8-hour test run, neither the rod nor the nuts or washers produced any odor, visible fumes, or discoloration, demonstrating the safety of the setup.
First, make a circular wooden base using scrap wood. The wax inside the aluminum tealight cup makes it safe as the heat will not affect the wood.
investment of time
It takes about an hour to make the circular wooden base and assemble the terracotta pot and hardware. Your project will complete faster if you opt out of creating a reclaimed wood base.
step by step guide
- First, create a neat wooden base to house your tealight candles and hardware.
- Glue two 3 cm (1.18 inch) thick pine scraps together and secure with dowels, then leave overnight.
- Next, square the wood to fit the terracotta pot you have. I chose approximately 25cm x 25cm (9.8 inches x 9.8 inches).
- Although not covered in this tutorial, we will create a circle cutting jig for cutting circles with a table saw. Once set up, you can cut wood quickly.
- Divide the circle into four squares and drill a 40 mm (1.6 inch) hole in the center of each to secure the tealight. This maintains a safe distance between candles and prevents flashburn. The Forstner bit will flatten the bottom and leave the tealight slightly protruding, making it easier to remove.
- Next, drill a 40 mm (1.6 inch) recess in the base to accommodate the nut and washer, and a 10 mm (4/10 inch) hole in the center for the threaded bar.
- Using an angle grinder, cut a section of threaded rod to about 30cm, roughly measure the length you need for the pot, and mark it with a permanent marker. The threaded bar is only 1 meter (39.4 inches) long, so you may need to do the same. If you don't have access to an angle grinder, you can also use a hacksaw.
- Then use a router with a coving bit to add some decorative flair to the base and make it easier to lift.
- Attach a small rubber strip to the base with epoxy to prevent slipping during use.
- The wooden base complements the pot nicely, but if woodworking is not possible, you can also use a terracotta flower pot with an upturned base. You can place the pot on brick, but it won't look as aesthetically pleasing.
- Secure a nylock nut and washer to one end of the threaded bar and recess it into the wooden base. We chose nylock nuts for added safety, as they support the entire structure and prevent it from coming loose. Due to space constraints, embedding two nuts within the 3cm (1.8 in) thickness of the base was not possible without compromising its integrity.
- Proceed with building the structure as follows.
- Secure the top of the base with one washer and then two nuts.
- Followed by two nuts and washers to support a medium-sized terracotta pot. Adjust as needed to desired height, leaving a 3 cm air gap to facilitate airflow and tealight placement.
- This is a terracotta medium bowl.
- Separate the medium and large pots using one washer, two nuts, and then another washer.
- A large terracotta pot.
- Finally, tighten the cap with one washer and two nuts.
- Tighten each set of nuts using two spanners if necessary.
How to use
Using the terracotta pot heater is easy. Place four tealights in the recess and ignite them in place with a match or stove lighter. The pot takes about 45 minutes to warm up and the tea light burns for about 4 hours.
This heater won't win any awards when it comes to heating large spaces, but it will provide a cozy atmosphere and help dry the air. We didn't do any rigorous scientific testing, but it made our small lounge more comfortable. Plus, it doubles as an attractive hand warmer. Remember:
- Never leave the heater unattended.
- Do not cover the heater. Terracotta pots get hot!
- Since it comes in a metal cup, please use only tea lights and not candles to avoid wax spills and ignition.
- To prevent wax from spilling, do not move the heater once it is lit.
- Scented tea lights can cause flash burns, so choose high-quality unscented tea lights.
- Be careful when blowing out tea lights to avoid wax splatters.
- See below for additional safety tips. candle safety guidelines.
With these precautions in mind, enjoy the soothing warmth and ambience of a homemade terracotta pot heater.
About the author
Michael Martin and Nikki Rixon started their Reclaim Design business in 2013. Subscribe to our YouTube channel Watch videos packed with practical advice, eco-friendly tips, and inspiration to live a more sustainable life.